In the beginning when God created the heavens and the earth he also created the HTML language and the JavaScript language soon after.
And God saw that it was good.
Then God said, “Let there be HTML DOM Events”. And it was so.
And God saw that it was good.
And God said, “Let there be DOM Event Listeners”. And it was so.
And God saw that it was good… But unfortunately, so did everyone else….
Even till this day, many programmers still see the “good” in using Event Listeners to build and develop applications.
Scattering the logic and state management throughout the application within small and encapsulated snippets of code.
Thus making the application:
- Hard to test and understand
- Difficult to add new features or alter existing ones
- Most definitely to contain bugs
And unless you’ve been living under a rock, this is NOT the way we build and develop applications nowadays.
Let’s examine the notion of modeling the application as a Finite-state machine.
A Finite-state machine is a mathematical model of computation. It is an abstract machine that can be in exactly one of a finite number of states at any given time.
The FSM can change from one state to another in response to some inputs or an event. The change from one state to another is called a transition.
An FSM is defined by a list of its states, its initial state, and the inputs/event that trigger each transition.
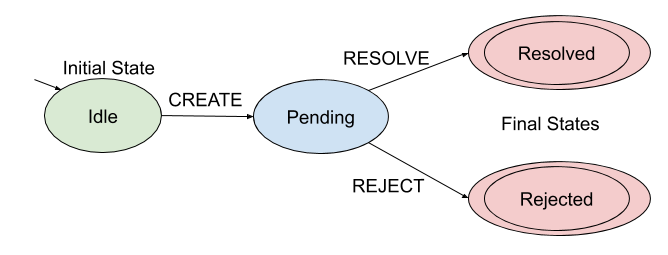
Let’s examine a machine which models a Promise in JavaScript:

If we wanted to model the machine in JavaScript, the code would be:
const machine = {
  initial: "idle",
  states: {
    idle: {
      CREATE: "pending"
    },
    pending:{
      RESOLVE: "resolved",
      REJECT: "rejected"
    },
    resolved: {},
    rejected: {}
  }
}
The machine is defined by the initial state (idle) and all the available states (idle, pending, resolved, rejected).
Each state contains the transitions it has.
Where each transition is defined by the event that caused the transition and the target state.
One can notice that the states resolved and rejected don’t have any transitions, which makes them the final states of the machine.
The XState Library (https://xstate.js.org/) helps us creating state machines for modern web apps.
These machines help us to keep track of the current state of the application and provide a way for invoking actions when a transition occurs.
By using state machines we don’t need to scatter the logic of the application throughout multiple files, but instead we concentrate the logic within a single object.
To demonstrate how XState works, we will develop a Binary Calculator by using a state machine.
The following challenge is taken from 10 Days of JavaScript Challenge published at HackerRank (https://www.hackerrank.com/challenges/js10-binary-calculator)
We will implement a simple calculator that performs the following operations on binary numbers: addition, subtraction, multiplication, and division.
The division operation is integer division only.
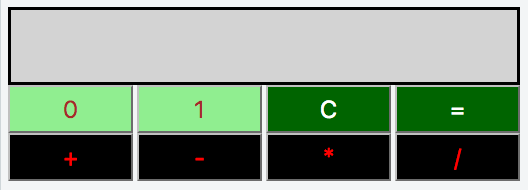
The calculator’s initial state will look like this:

All expressions are entered in the form
operand1 → operator → operand2Where operand1 is the first binary number, operand2 is the second binary number, and operator is in the set {+, — ,*, =}.
For example, consider the following sequence of button clicks:
1 → 1 → 0 → 1 → 1 → + → 1 → 0 → 0 → 0 → =Before pressing the = button, the display looks like this:

After pressing the = button to evaluate our expression, the display looks like this:

Notice that (11011)2 = (27)10, (1000)2 = (8)10, and (100011)2 = (35)10, so our calculator evaluated the expression correctly.
When an invalid sequence is entered, the display will be painted with a red background:

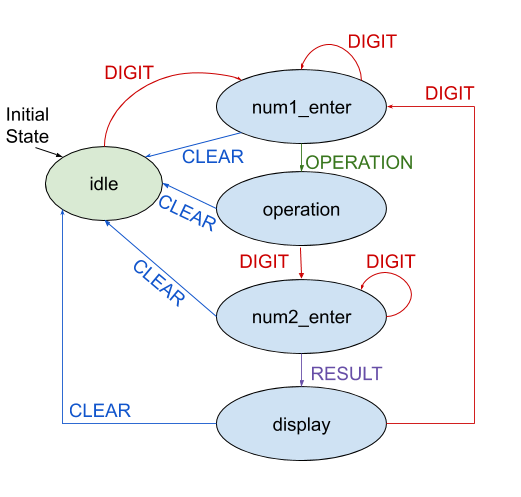
Before we start coding, we will create a diagram of the state machine of our application.

For this machine we have 5 states:
- idle : The initial state of the machine where the display is empty and waiting for the first digit of the first number to be entered.
- num1_enter : The state where the first number is being constructed, and the first number has at least one digit.
- operation : The state where an operation has been chosen.
- num2_enter : The state where the second number is being constructed, and the second number has at least one digit.
- display : The state where the expression is evaluated and displayed, and the calculator awaits for another expression to be entered.
And we have 4 events:
- DIGIT : The user pressed a digit button in the calculator.
- CLEAR : The user pressed the
Cbutton in the calculator. - OPERATION : The user pressed one of the operation buttons in the calculator (
+,-,*,/). - RESULT : The user pressed the
=button in the calculator.
Now that we have created a model to represent the application’s logic we can now start coding 😀
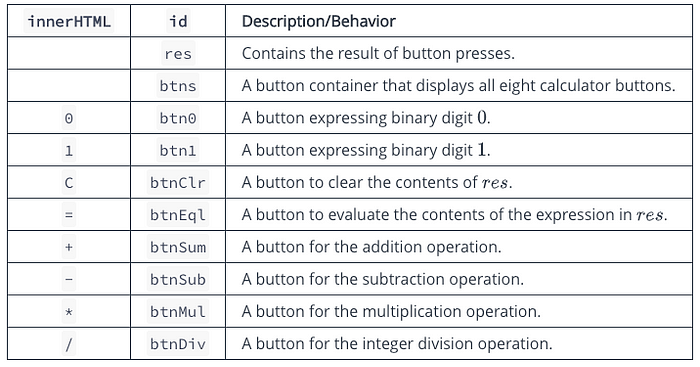
Let’s start from the GUI side of the application so we could use it later in our code.
Notice that in line 9 we add the XState Library through CDN.
In the JavaScript file we will have a XState variable that is available globally.
const { Machine, interpret, assign, send, createMachine } = XState;We created all the elements in the DOM in the following manner:

Once we created the DOM elements, we can now focus only on the JavaScript side of the application
In the JavaScript file we will store all the elements in the array elements and store a reference to the display div (resultDiv) for future use.
The first thing we should create is the appropriate machine that describes the model shown earlier.
Similarly to the previous machine we created, XState requires a machine object with some minor differences:
const machineObject = {
    initial: 'idle',
    states: {
        idle: {
            on: {
                DIGIT: 'num1_enter',
                CLEAR: 'idle'
            }
        },
        num1_enter: {
            on: {
                DIGIT: 'num1_enter',
                OPERATION: 'operation',
                CLEAR: 'idle'
            }
        },
        operation: {
            on: {
                DIGIT: 'num2_enter',
                CLEAR: 'idle'
            }
        },
        num2_enter: {
            on: {
                DIGIT: 'num2_enter',
                RESULT: 'display',
                CLEAR: 'idle'
            }
        },
        display: {
            on: {
                CLEAR: 'idle',
                DIGIT: 'num1_enter'
            }
        }
    }
});
The difference is that for each state we need to wrap all the transitions within an on object.
Unlike the previous machine we created for Promise , we are required to store data that relates to the events invoked by the user.
XState provides us a contex object that stores data and can be referenced when an event occurs.
We will create a contex that will have the following fields:
- num1: The first binary number entered to the calculator (until an operation button is pressed)
- num2: The second binary number entered to the calculator (until the
=button is pressed) - operation: The operation that was entered in the calculator
- result: The value which is display in the calculator
Thus, our state machine will be as follows:
const machineObject = {
    initial: 'idle',
    context: {
        result: "",
        num1: "",
        num2: "",
        operation: "",
    },
    states: {
        ....
    }
});
Now that our machine is almost complete, we will use XState for creating a service that will interpret the machine we built.
const service = interpret(machineObject);The service will listen for incoming events from the user, will keep track on the current state of the machine and will activate actions when a transition between states occurs.
Using the service we will add a listener (onTransition) that will update the display of the calculator whenever a transition occurs.
// Updating the display of the calculator
service.onTransition((state) => {
  resultDiv.innerHTML = state.context.result;
});service.start(); // starting the service
Now, we need to create a simple event listener for each DOM element that will only notify the service about the event.
Whenever an event occurs, we will notify the service by invoking the function send()
service.send(...)We will create a custom event with an event type and a payload (if needed) and send it to the service
Since we have multiple operation and digit buttons, we will create a function for invoking a DIGIT event and another for invoking an OPERATION event
And the event listeners for all the buttons will be as follows:
Now we can focus on the actions that will update our context and display.
For our application we need 3 types of actions:
- Clearing the display when the user presses the
Cbutton. - Updating the display and context when a digit button or an operation button is pressed.
- Calculating and displaying the result of the evaluated expression.
Thus, we need to create an action function.
Each action function in XState is a function with the following form:
(context, event) => {...}Whenever an event is sent to the service, XState inspects the current state of the application and invokes the appropriate action (or actions).
When an action is invoked, XState injects the context of the machine and the event object as parameters to the function.
A common action in XState is the one which is created by the assign() method.
The method takes a context “assigner”, which contains actions that represent how values in the current context should be assigned, and actives them all.
To demonstrate how assign() works, let’s create the action that clears the display when the user presses the C button..
We wish to clear all the properties of the context (num1, num2, operation and result).
Thus, the appropriate action (clearResult) will be:
Regarding the other buttons (excluding the= button) we would like to create an action that updates the display and context when a button is pressed.
Thus, we will create the actions: addToNum1, addToNum2, addToOperation and addToResult .
For the = button, we would like to create the action that calculates the expression and updates the display.
The process of calculation will be:
- Convert
num1,num2from binary to decimal. - Perform the appropriate operation.
- Convert the result to binary
- Update
resultwith the binary result.
Thus, the action (calculateResult) is as follows:
Now that we have all the needed actions, we can finally complete the machine.
For each transition we will add a list of actions (or a single action) that will be invoked sequentially before we transition to the target state.
Let’s complete the machine.
The last thing left is handling an invalid sequence of input.
To specify to the machine what needs to be done when an unknown event is invoked, we can just use a Wildcard event (*)
Wildcard card events match any event if the event is not matched explicitly by any other transition in the state.
Explicit events will always be chosen over wildcard events.
First, Let’s create an action that will change the background color of the display to red
const onError = () => {
  elements["res"].style.backgroundColor = "red";
}
And let’s add the action to the machine in each wildcard event:
However, we still need to return the background color back to normal, when the error is resolved.
For that let’s create a function that will change the background back to normal.
const onValid = () => {
  elements["res"].style.backgroundColor = "lightgray";
}
And add the function call to all the previous actions we created:
Finally we can see the application in action
One can still live in Genesis era and use cumbersome event listeners that will eventually lead to poorly built applications.
Or one can start living in modern times, and start enjoying the joy of programming with a state machine close at hand.
Then God said, “Let there be XState State Machines”. And it was so.
And God saw that it was great!
For further reading I highly recommend visiting the XState docs (https://xstate.js.org/docs/) and finding more features (and there are plenty of them that couldn’t be covered in the scope of this article).
And most of all, I urge you to watch the online course State Machines in JavaScript with XState by David Khourshid, currently available at Frontend Masters (https://frontendmasters.com/courses/xstate/)
